Send HTTP Requests Using Agent Configuration
What is Agent Configuration?
LOC provides agents for operating not only internal data sources, but also external ones like HTTP endpoints, databases, FTP servers and SMTP servers. These is what makes LOC truely useful for building data pipelines across your organization.
However, these external sources often require authentication information (user account name and password, etc.), which may bring some issues:
- Hard-coding or pass unencrypted confidential data into logic would be a huge security risk.
- It would be a nightmare trying to maintain/update confidential data across numerous data processes.
Since v0.7.0, LOC provides Agent Configuration for authorised users to create and maintain connection profiles for HTTP, database, file sorage and mail agents. Here we'll learn how to create a configuration for your HTTP agent.
In order to use an agent configuration, you'll need to complete three steps:
- Create a new configuration.
- Add the configuration into a logic with a reference name.
- Have an agent setup its client using the reference name.
The tutorials is written for JavaScript and LOC Studio. For CLI users, see the CLI Handbook for how to deploy agent configurations.
In future releases agent configucations can only be accessed by LOC Owners.
Create a Configuration
For this tutorial, we'll use the HTTP agent to invoke https://httpbin.org/anything. This is a public API that simply returns anything you've sent to it, which is ideal for testing purposes.
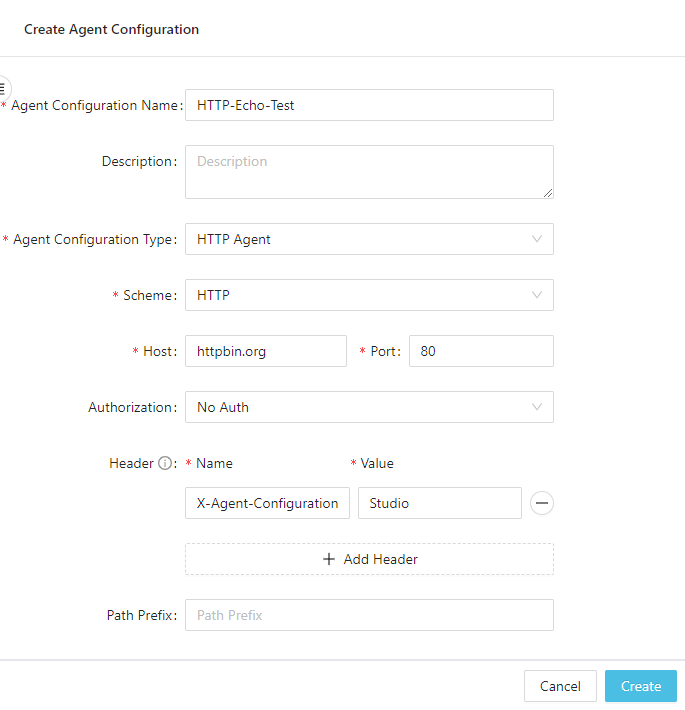
In Studio, go to Administration then click the panel Agent Configuration. On the right first create a folder, then right-click the folder to create an configuration:
-
Give the configuration a name (it cannot have spaces).
-
Host is
httpbin.org, scheme isHTTP, port is80, prefix is empty. -
Other options like headers are free to add (for example, here we have a custom header called
X-Agent-Configurationwith the valueStudio).
Then click Create.
Add a Configuration to Logic
To be able to use the configuration in a logic, you'll have to explicitly add it.
While creating or editing a logic in Studio, open the Agent Configuration panel, then click Add a row. Click the name field to find the configuration you need:
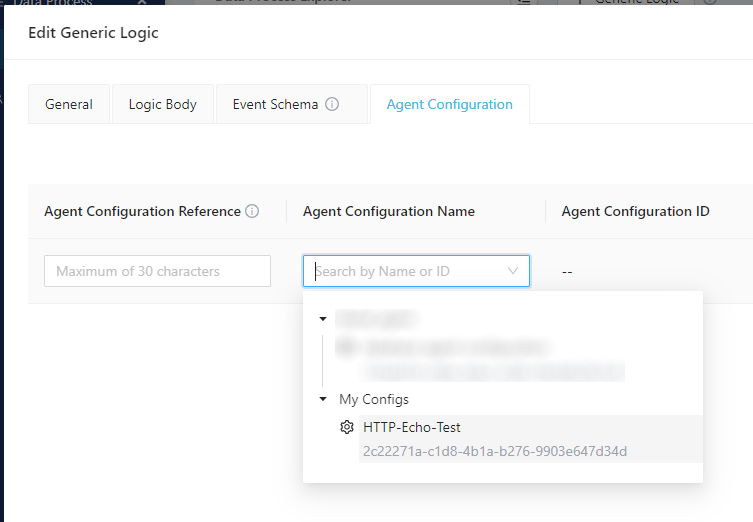
Set a reference name (in this example we'll call it my-http-config) then click OK.

That's all you need to do to setup the HTTP agent configuration.
Logic created in Studio can only access agent configurations created in Studio.
Setup the same HTTP agent configuration in CLI
To setup and deploy the same HTTP agent configuration from CLI, first create a config file and modify it as follows:
name: my-http-config
description: my-http-config
credential:
    type: Unset
headers:
    X-Agent-Configuration: CLI
host: httpbin.org
pathPrefix: ""
port: 80
scheme: Http
To setup the same HTTP agent configuration in local simple runtime, first add the configuration in run-local-task.yaml:
# ...
agentConfigurations:
    # ...
    http:
        - host: httpbin.org
          port: 80
          scheme: Http
          pathPrefix: ""
          name: my-http-config
          headers:
              - name: X-Agent-Configuration
                value: SimpleRuntime
Then add the config name in config.yaml of your data process project:
# ...
agentConfiguration:
    # ...
    http: [my-http-config]
See the CLI Handbook for how to deploy agent configurations.
Data processes deployed from CLI can only access agent configurations deployed from CLI. Also, you should avoid using the same config name in both CLI and Studio.
HTTP Agent Code Walkthrough
Now create a data process with the following logic code:
| Logic | Purpose |
|---|---|
| Generic logic #1 | Read and parse JSON payload |
| Generic logic #2 | Send a HTTP POST request with the payload and read the result |
| Aggregator logic | Finalise result |
import { SessionStorageAgent, LoggingAgent } from "@fstnetwork/loc-logic-sdk";

export async function run(ctx) {
    // read and parse JSON payload
    const payload = await ctx.payload();
    const data = payload.http.request.data;
    const parsed = JSON.parse(new TextDecoder().decode(new Uint8Array(data)));

    // log parsed payload
    LoggingAgent.info({ parsed_payload: parsed });

    // write the JSON object to session
    await SessionStorageAgent.putJson("parsed", parsed);
}

export async function handleError(ctx, error) {
    // error logging
    LoggingAgent.error(error.message);
}
import {
    SessionStorageAgent,
    HttpAgent,
    Http,
    LoggingAgent,
} from "@fstnetwork/loc-logic-sdk";

export async function run(ctx) {
    // read parsed JSON from session
    const parsed = await SessionStorageAgent.get("parsed");

    // create a HTTP client using our agent configuration reference
    const httpClient = await HttpAgent.acquire("my-http-config");

    // send HTTP POST request
    const response = await httpClient?.post(
        "anything", // http path: the full URL will be httpbin.org/anything
        {}, // no additional headers
        Http.ContentType.Json, // content type: JSON
        new TextEncoder().encode(JSON.stringify(parsed)), // body
    );

    // if the response is HTTP 200 OK or 301 Move Permanently,
    // read and parse the response body
    let data = null;
    if (response?.status === 200 || response?.status === 301)
        data = JSON.parse(new TextDecoder().decode(response?.body));

    // prepare result
    const result = {
        http_status: response?.status,
        data: data,
    };

    // log result
    LoggingAgent.info(result);

    // store result in session
    await SessionStorageAgent.putJson("result", result);
}

export async function handleError(ctx, error) {
    // error logging
    LoggingAgent.error(error.message);
}
import {
    SessionStorageAgent,
    ResultAgent,
    LoggingAgent,
} from "@fstnetwork/loc-logic-sdk";

export async function run(ctx) {
    // read result from session
    const result = await SessionStorageAgent.get("result");

    // finalise result
    ResultAgent.finalize({
        status: "ok",
        taskId: ctx.task.taskId,
        result: result,
    });
}

export async function handleError(ctx, error) {
    // finalise result withe error message
    const err = {
        status: "error",
        taskId: ctx.task.taskId,
        error: error.message,
    };

    LoggingAgent.error(err);
    ResultAgent.finalize(err);
}
Test the HTTP Agent
See Quick Start for how to invoke a data process with either single execution or an API route.
For example, if you submit the following payload through an API route to the data process
{
    "name": "Zaphod Beeblebrox",
    "number-of-heads": 2
}
You should see the following result, which indicates most of the content of your HTTP request:
{
    "status": "ok",
    "taskId": {
        "executionId": "...",
        "id": "..."
    },
    "result": {
        "http_status": 200,
        "data": {
            "args": {},
            "data":"{\"name\":\"Zaphod Beeblebrox\",\"number-of-heads\":2}",
            "files": {},
            "form": {},
            "headers": {
                "Accept": "*/*",
                "Accept-Encoding": "gzip",
                "Content-Length": "22",
                "Content-Type": "application/json",
                "Host": "httpbin.org",
                ...
            },
            "json":{
                "name":"Zaphod Beeblebrox",
                "number-of-heads":2
            },
            "method": "POST",
            "origin": "xxx.xxx.xxx.xxx",
            "url": "http://httpbin.org/anything"
        }
    }
}